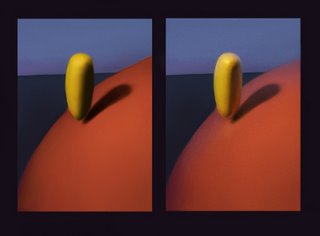
I did a quick one for this week to illustrate a couple things I use all the time.
First of all, I like to think of each surface in my paintings as a light source that will bounce its light onto surrounding objects. The amount of light being reflected decreases with distance from the object "producing" the light.
Also, when painting these reflected lights I like to use layers with the "Lighten" method. This does a pretty good job of preserving the highlights from the main light source, while approximating the additive effect that light has on surfaces. It doesn't always work perfectly, but usually can save a lot of painting time.
I made this example, before using the light layers and after:

I used a primary color scheme to show how much you can exaggerate light effects without (hopefully) being too offensive to the eyes. In reality, unless these were very shiny surfaces you wouldn't get reflected colors as saturated as this because the local color of bright red and yellow objects would be absorbing anything that wasn't red or yellow, respectively.
First of all, I like to think of each surface in my paintings as a light source that will bounce its light onto surrounding objects. The amount of light being reflected decreases with distance from the object "producing" the light.
Also, when painting these reflected lights I like to use layers with the "Lighten" method. This does a pretty good job of preserving the highlights from the main light source, while approximating the additive effect that light has on surfaces. It doesn't always work perfectly, but usually can save a lot of painting time.
I made this example, before using the light layers and after:

I used a primary color scheme to show how much you can exaggerate light effects without (hopefully) being too offensive to the eyes. In reality, unless these were very shiny surfaces you wouldn't get reflected colors as saturated as this because the local color of bright red and yellow objects would be absorbing anything that wasn't red or yellow, respectively.